Thursday, July 11, 2013

Salt & Pepper Chilli Prawns


After weeks of North American food tantalizing our taste buds, it was time to bring some Asian zing to our table.  As a longtime fan of Chinese style S&P Squid, I decided to road test using prawns in the same recipe.  
The result… salty, spicy and oh-so-nicey!

Salt & Pepper Chilli Prawns
(serves two lovers or friends)
2 tbsp of cornstarch
1 tsp of granulated sugar
Pinch of Chinese five-spice powder
1 tsp Maldon sea salt flakes
1 tsp ground black pepper
5 large cloves of garlic, finely diced
1 serrano chilli, thinly sliced into rounds
4 large green onions finely sliced
24 lg prawns, peeled and de-veined
3½ tbsp of peanut or canola oil
1 small lime, cut into 4 wedges

Firstly, in a large bowl, mix your cornstarch, sugar, five-spice powder, salt, and pepper.
Then, in a small bowl, mix the garlic, chilli, and green onions; set aside.
Pat the prawns dry with paper towels. Line a small baking sheet or large plate with a double layer of paper towels. Add the shrimp to the cornstarch mixture and toss until evenly and thoroughly coated.
In a heavy-duty fry pan, heat 1½ tbsp of oil over med-high heat until very hot. Add half of your prawns in a single layer. Cook without disturbing until deep golden and spotty brown on one side, for about 2 minutes. Using tongs, quickly flip each prawn and continue to cook until the second sides are a spotty golden brown too, for about 1 minute longer. (Note: prawns may not be cooked through at this point.) Transfer the prawns to your paper towel sheet. Add another 1 tbsp of the oil to the fry pan and repeat with the remaining prawns, again transferring them to the sheet when done.
Reduce the heat to medium and add the remaining 1 tbsp of oil to your pan. Add the garlic mixture and cook, stirring constantly, until the chili and green onions are softened and the garlic is golden & toasted (about 1 minute). Return the prawns to the pan and stir to combine.
Serve immediately, with the lime wedges, steamed jasmine rice and oyster sauce drizzled steamed greens. 
ENJOY!

| SIMPLE | DELICIOUS | NO-FUSS |

Try it and let me know what you think!
Daisy Angela xo


Wednesday, July 10, 2013

I'm Back Baby!

Sadly for me, my summer vacations are over for the moment…


I shared the sights, sounds & tastes of Toronto with family at WVRST, Spirit House, The Distillery District and Salt Wine Bar.

And I BBQ-d with the best at our cottage on Lake Huron in Tobermory, Ontario.

BUT…
NOW I'M BACK
And I'm feeling more inspired than ever.  So watch this space,

Daisy Angela xo


Follow my food styling inspirations & recipe ideas on:
Twitter http://twitter.com/deGirlsGottaEat

Tuesday, May 14, 2013

FACEBOOK - Share the LOVE

Click onto the FOODIE INSPIRATIONS album on Facebook; an exciting addition to the new Because A Girl's Gotta Eat page.  


LIKE our Page & Posts COMMENT as you drool TRY the recipes at home SHARE your kitchen experiences

Because A Girl's Gotta Eat… xo


Saturday, May 11, 2013

~ Happy MOTHER'S Day ~


These are the only stove your Mum should be behind on Mother's Day…

Take good care of her and treat her to flowers & feasts,

Because A Girl's Gotta Eat…

xo


Like us on Facebook http://www.facebook.com/BecauseAGirlsGottaEat

Monday, May 6, 2013

What a TART?!

Now that it finally feels like SPRING in the Northern hemisphere, I think we're all applauding the long-awaited sunshine!  With our smiles beaming just like the sun, we can finally enjoy al fresco afternoon teas on our patios, balconies & gardens.  
This recipe is an ideal example of an elegant, classic pastry.  Personally, I think a glass of bubbles would be the perfect accompaniment to this apple-adorned treat, but feel free to use your favourite china and enjoy a cup of tea… pinkies out of course!  


Caramelized Apple Tarts

(serves 4 - 8 depending on your generosity)

6 Gala or Pink Lady apples
½ cup of water
½ cup of sugar
½ vanilla bean, split lengthwise
1 pack of frozen puff pastry sheets, thawed
Flour for dusting
1½ tbsp unsalted butter, melted

Serve with vanilla bean ice cream or
thick & rich clotted cream 


Firstly, move your oven racks to the upper & lower thirds of your oven and preheat to 200C/400F.  Then line 2 large baking sheets/trays with parchment paper.  

Next, peel your apples, reserving their skins.  Stir together, water & 6 tbsp of sugar in a 1-quart heavy saucepan, then scrape the seeds from the vanilla bean and throw in the pod.  

Add the reserved apple skins and bring to boil, stirring until the sugar has dissolved.  Remove from the heat and let stand for 10 mins before pouring through a medium-mesh sieve, into a bowl.  Press hard against the skins to ensure all the syrup is released,   then discard the apple peels.

With a lightly floured rolling pin & surface, roll out one of the thawed pastry sheets into in a 10-inch square, then cut in half and transfer to one of your baking sheets.  Repeat this process with your 2nd piece of pastry and transfer to your 2nd baking sheet.

Halve your apples lengthwise, core with a melon-baller or small spoon, then cut crosswise into very thin slices (⅛ inch thick or less), keeping the apple halves intact.  Fan the slices slightly whilst maintaining their domed 'apple' shape, then arrange 3 halves in a row on each piece of pastry, leaving an ⅔  inch border on all sides.

Brush these borders lightly with your apple syrup and fold over about ⅓ inch, so the borders touch the edges of the apples.  Crimp the borders with a fork, then lightly brush these and the apple slices, with your syrup.  Next, thoroughly brush the apples with melted butter and sprinkle evenly with remaining 2 tbsp of sugar.

Bake your tarts in the upper & lower thirds of your oven for 20 minutes, then switch the position of the sheets and reduce the oven temperature to 190C/375F.  Bake tarts until edges are golden, for an additional 15 to 20 mins.  
**Rotate tarts 180 degrees if pastry edges are not browning evenly.  

While tarts bake, boil remaining syrup over a moderate heat for 30 seconds to 1 min, until it is reduced to ¼ cup.  Once removed from the oven, allow tarts to stand for 5 mins before brushing the warm apples with the remaining syrup.  

Slice each tart into portions, whether dainty or gluttonous, and serve with quenelles of clotted cream or ice cream for a touch of sophistication.  Finally, try to maintain your ladylike disposition while you devour these tantalizing treats...

ENJOY!

| SIMPLE | DELICIOUS | NO-FUSS |

Try it and let me know what you think!

Daisy Angela x

Follow my food styling inspirations & recipe ideas on 

Monday, April 8, 2013

So long, Maggie...

Today, we farewell a woman who'll forever be remembered for her ambition, bold decisions and strength of character.

Whilst she'll remain a 'controversial' figurehead, her achievements will inspire generations of women to come, as noted in President Obama in his statement today, "As a grocer's daughter who rose to become Britain's first female prime minister, she stands as an example to our daughters that there is no glass ceiling that can't be shattered."     

May Baroness Margaret Thatcher rest in peace, with an endless supply of her favourite meal to hand… haddock & chips.  And may we always admire her bravado, whether we agreed with her views or not.

Daisy Angela x
Follow my food styling inspirations & recipe ideas on 
Pinterest http://pinterest.com/DaisyAngela/becauseagirlsgottaeat/
Twitter http://twitter.com/deGirlsGottaEat

Friday, March 22, 2013

Such a COP out!

Amongst MANY items I intend on collecting for my 'dream kitchen', an array of copper pots is towards to top of my list.  Not only do they look gorgeous with their rustic charm, but they also conduct heat impeccably, making them chef favourites.


There IS a downside though, their beauty requires maintenance… but who ever said beauty wasn't worth the effort!

Daisy Angela x

Follow my food styling inspirations & recipe ideas on 

Wednesday, March 20, 2013

SPRING HAS SPRUNG… apparently

While March 20th marks the Spring Equinox in the Northern Hemisphere, you'd be forgiven for shaking your head in disbelief.  However, regardless of the snow flakes & winter chills that insist on grate-crashing Spring, we can get just a little excited that warmer weather should be with us soon. 

And what would Spring be without its dazzling display of flowers?!  Soon gorgeous BLooMS & BloSSoMS will be adorning vases & vessels, grown in gardens and used as ingredients & garnishes in the kitchen.
  
Have you ever considered adding edible flowers to your dish?


This beautiful salad by Italian chef Andrea Aprea is simply too pretty for words and is guaranteed to WOW your guests this Spring.  The recipe is simple in essence, yet slightly laborious for a salad http://www.finedininglovers.com/recipes/main-course/salad-recipes-andrea-aprea/ .  But that said, the presentation power of this dish is beyond impressive, so why not give it a try and add some fine dining flair to your repertoire!  **Or, just visit Andrea's restaurant in Milan for a Spring vacation… 

Now I'll forgive you if the above seems a little too ambitious, but I do encourage you to have a browse through this list of edible flowers, many of which you may have in your garden already.  

So why not consider celebrating Spring in a new way this year by flirting with flowers in the kitchen?  I for one am all for it, so stay tuned for some posies on my plates.  


Daisy Angela x


Follow my food styling inspirations & recipe ideas on 

Teriyaki Glazed Baked Chicken

Who can resist the sweet, sticky deliciousness known as Teriyaki Chicken?  No sumo or samurai I know! ** Totally a figure of speech?!
Nonetheless, you'll have licked-clean plates if you serve this for dinner with some spiced'up asian greens & a traditional green onion garnish.  Not only that, but your kitchen will smell heavenly for the rest of the night…. 
Oooh, I'm salivating as a type!  
    
Teriyaki Glazed Baked Chicken   
(for 2 lovers of friends)

1tbsp cornstarch
1tbsp cold water
½ cup white sugar
½ cup soy sauce
¼ cup cider vinegar
1 clove of garlic, minced
½ tsp ground ginger
¼ tsp ground black pepper
4 skinless, boneless chicken thighs
sesame seeds
4 green onions
baby bok choy
sesame oil
chilli flakes


In a small saucepan,over low heat, combine: cornstarch, cold water, soy sauce, vinegar, garlic, ginger & ground black pepper.  Allow to simmer, stirring frequently, until sauce thickens and begins to bubble.

Preheat oven to 220C/425F.

Place chicken pieces in a lightly greased baking dish and start basting!  Turn your pieces over and then baste again. 

Bake in your preheated oven for 30 mins.  Après ça, turn pieces over, and bake for another 30 mins, until chicken is cooked/no longer pink and the juices run clear.  And don't forget to baste with your marinade, every 10 mins during cooking…

During the final 30 min bake-off, prepare your rice, finely shred your green onions and steam your baby bok choy in the very last few minutes.  When plating up, lay your greens upon your rice, drizzle with the tiniest amount of sesame oil & sprinkle with chilli flakes.  Add your gorgeously glazed Teriyaki thighs, basting with any left over pan juices, shimmie-shake over some sesame seeds and garnish with your green onions.  You'll love this meal, I promise!

Friendly Advice… soak your baking tray while it's still warm, you'll thank me later.

ENJOY!

| SIMPLE | DELICIOUS | NO-FUSS |

Try it and let me know what you think!

Daisy Angela x

Follow my food styling inspirations & recipe ideas on 

Sunday, March 17, 2013

Happy St. Patrick's Day

While some may be nursing sore heads thanks to early St. Patrick's Day festivities, I plan on embracing some Irish cheer in the kitchen today.  Ain't nothing quite like an Irish Stew on a cold day and while the sun may be shining, 'to be sure, to be sure', the thermostat is very much in the negative.  


May the luck of the Irish be with you today!

Daisy Angela x

 images courtesy of Pinterest - photography credits N/A

Thursday, March 14, 2013

How intriguing the art of Food Styling is…

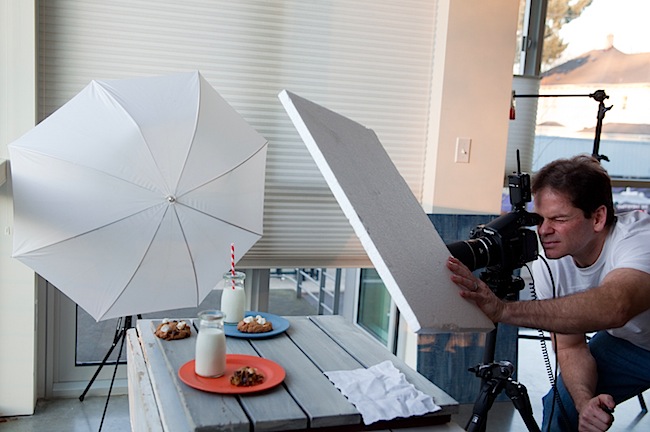
Beautifying the food we eat, has never been more important than it is today.  In the digital age of social media we're so proud & equally as eager to visually document the world we live in.  So how does this impact the home cook?


When it comes to the food styling & photography of my own culinary delights I have three main stumbling blocks…


  • I'm using only my iPhone with no additional lighting gizmos at my disposal
  • I have very limited serveware options & surfaces to enhance my pics
  • I have made the meal TO EAT and have a 'get it while it's hot' mentality


So, today I have decided to say, PFFFFT?!!, to these hinderances and have looked to some pro's for some inspiration.  

Jamie Kimm brings a dark lit, brooding sexiness to many of his shoots, much like Annie Leibovitz does in fashion editorial.  I love the mood this creates… although sadly, I think my iPhone will let me down when it comes to re-creating even an amateur version of this ilk.


What I like about what Roscoe Betsill does, is that his shoots have a contemporary & well-styled, yet nonchalant feel to them.  I think my photos will definitely benefit from more staging, by depicting the dining experience and not just the dish itself.  


And Donna Hay is a woman after my heart…  
With a food-focused empire under her belt, she is more chic than 'sheila' and this Australian stylist knows how to do casual cool, oh-so-well.  Whilst opting for clean, minimalist scenes, her thoughtfully prepared ingredients become the hero and the result is simple sophistication.  Lighting plays a big role in her photographs, which are white & bright; an aspect of my own pics I could definitely improve.  


  1. Be inspired & admire the pro's, BUT work with what you've got until you're willing to invest in equipment.
  2. Consider staging BEFORE you start cooking.  Can you create a sense of ambiance which reflects the meal?  Incorporate different textures, nic-nacs and add personality to your staging, then add your freshly prepared dish to the scene at the last moment, before taking your photographs.
  3. You can create a mouthwatering & visually beautiful composition with the most simple serveware.  When you lack serving variety, allow your ingredients to add the personality and be considered in your preparation to ensure a picture perfect finish no matter what.
Hopefully from here on in, my own photos will convey these learnings…  Of course studio shoots with professional equipment will always deliver an enviable result, but for the mean time, I'm happy to keep-on-keeping-on with my iPhone.

If you see an improvement, drop me a line!


Daisy Angela x
 
Follow my food styling inspirations & recipe ideas on 

Thursday, March 7, 2013

I'd Walk All Over Town For...


Yes, friends… I am OBSESSED with burgers!

The love affair started long ago, from humble beginnings.  Childhood bribery in the form of a Mc D's 'Happy Meal' after a trip to the Dr or a cheeseburger for being a 'good girl' while Mum was shopping… this was the norm for my cousins & I.  If our parent's felt guilty about fast-food, they'd make us a homemade 'Filet-o-Fish' washed down with soda water & orange juice in lieu of Fanta.  The point is, whether homemade, mass produced or gourmet, this girl just LOVES burgers.

COLD HARD EVIDENCE? 
Visit my 80-pic strong Pinterest board called Burger Lovin' & start salivating! 

Daisy Angela x

 images courtesy of Pinterest - photography credits N/A

Tuesday, March 5, 2013

KiTSCHen EssentiALS


I JUST LOVE THIS!


To me, the perfect kitchen needs to be embellished with decorative treasures just as much as it should house handy utensils.


How lovely is this vignette of  porcelain wares, oil painted scenes, ranunculus in bloom & zesty clementines?! 


With a chic, nonchalant charm, of 'lived-in' homeliness I can almost smell the coffee brewing…


I cannot wait to piece together my perfect but kitsch little KiTSCHen.  


Daisy Angela x

* image courtesy of Pinterest - photography credits N/A

Friday, March 1, 2013

Luscious Lemon & Dill Lamb

When the temperature dips, we crave a little comfort food to warm us through, so I was intrigued by the simplicity of flavours in this stew, which I found makes for an incredibly flavoursome yet simple dish!  You’ll probably have most of the ingredients at home already so it’s a delicious yet cost-effective meal (which means more $$$ left over for wine) and will be on your table in just over an hour.  Now I prefer to buy lamb leg steaks and dice them myself so I can include the lovely marrowy bone in the stew for added flavour, but you CAN just buy pre-diced lamb.  

This is one moreish, lick-the-bowl-clean kinda meal though, so you’ll need incredible self control if you’re making this for a love-in date meal!


Luscious Lemon & Dill Lamb ( for 2 lovers or friends )
350g pre-diced lamb or lamb leg steak
2 tsp plain flour
Seasoning
1 tbsp olive oil
4 glugs Worcestershire sauce 
1 red onion chopped in strips
300ml hot chicken/veg stock
3 tbsp chopped fresh dill
1 bay leaf
300g fingerling potatoes, 
thickly sliced w/ skin on
2 handfuls of fresh green beans
zest & juice of ½ lemon
4 tbsp of crème fraîche
Herbed Croutons
¼ of a left-over, unsliced bread loaf 
OR ⅓ of a baguette
drizzle of olive oil
good sprinkling of italian dried herbs
crumbled sea salt flakes 
(I LOVE Maldon Sea Salt - The Only Way Is Essex ha!)

Preheat your oven to 200C/400F for your croutons.  Start by dicing your lamb leg steak, or readying your flour mix.  Add a good dash of seasoning and your flour into a bowl and toss your diced meat through in batches, ensuring each cube is nicely covered.  Meanwhile, heat the oil in a heavy-based pan, add the onions and sautée for 5mins until softened (the red onions will add a subtle sweetness).  Then add the lamb and stir well until sealed and slightly golden, then add your glugs of Worcestershire.

Stir in all your stock, 2 tbsps of fresh dill, your bay leaf & potatoes and bring to the boil, before allowing to simmer on a low heat for 30mins - you are now entitled to some vino! Next, add the juice of half your lemon and return to simmer for another 20mins.  After this, add your green beans (which have been topped’n’tailed) and your stew will be ready in 10mins.  

** Tip - I prep the croutons during the 20min ‘lemon juice’ simmer and pop them in the oven just after I’ve added the beans to the stew.  This will mean you’re bang on time when it comes to plating up.  

To make your Herbed Croutons, either cut your bread loaf until 7cm/3” cubes or prepare your baguette in 3cm/1” diagonal slices, then add to a baking tray.  Drizzle with olive oil and give the tray a good shake to coat the bread.  Now, add a liberal sprinkling of italian herbs to your croutons and some lovely salt flakes.  Bake for 5-7mins until golden brown and smelling delish!  

You’re now ready to plate up, so pick your prettiest of bowls or dishes and ladle your stew in.  Spoon 2 tbsps of crème fraîche to each bowl and top with a scattering of lemon zest & dill.

ENJOY!

| SIMPLE | DELICIOUS | NO-FUSS | 

Try it and let me know what you think!  

Daisy Angela x

Follow my food styling inspirations & recipe ideas on